Building Applications with AJAX
AJAX is a relatively new method utilizing JavaScript
to handle application processing without the need to refresh the page or
redirect to a different page. JavaScript is used to send the data in XML,
JSON, HTML, text and other formats to send and retreive data from the server.
The word AJAX is really an acronym for Asynchronous JavaScript and XML.
Select from the drop-down list below to see it work.
This text will be replaced by the President’s information.
JavaScript Explained
In order to transfer data to and from the server without refreshing,
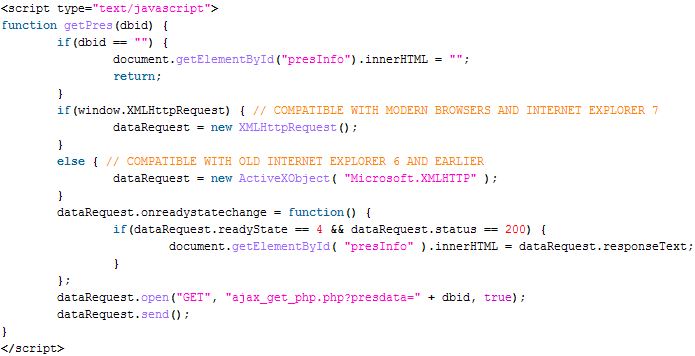
you use what’s called the XMLHttpRequest object. Here’s the explanation of the code below.
- Create the function getPres that will be executed once it’s called by the onchange event in the drop-down list.
- You’ll notice a Parameter of “dbid” in parenthesis after the function name. This is a variable that will receive the value of the menu item selected (ex: 1, 2, 3, 4 or 5).
- The next statement is an if statement that finds the element with the id of “presInfo” and changes whatever is inside of that div tag with the data being retreived.
- Next is and if…else statement that uses the correct request method based on the browser version and set’s it’s value to the dataRequest variable.
- The next function is for determining if the full server response has been received by checking that it has a ready state of 4, and if the AJAX call is successful which gives a response code of 200. If everything executes properly the div tag with the id of “presInfo” will receive the requested data via the “responseText”. As we mentioned above, AJAX doesn’t only handle text. In this our call is grabbing database text data, image paths and an HTML table.
- The last two statements are for sending the request to our PHP page. It can be sent to a scripting page such as .php, .aspx, .cfm, a text file, JSON file or an XML file.
- The open method has three parameters: the method (GET or POST), the URL and a boolean value of either true or false. True is the default and designates that it’s asynchronous. That means the AJAX call is processed independently from the rest of the web page. A user can be performing other functions on the page and the AJAX data will populate whenever it’s ready, regardless of the other functions the user is performing on the page.
- The send() method is used to send data if you’re using the POST method. In this example it would be used if we are writing information to the database, such as a commenting section.
HTML Explained
Next we’ll get into how the page elements
interact with AJAX. Even though I’m not writing the instructions in
exactly a step-by-step format, I’m going to list it out to make it a
little easier to follow.
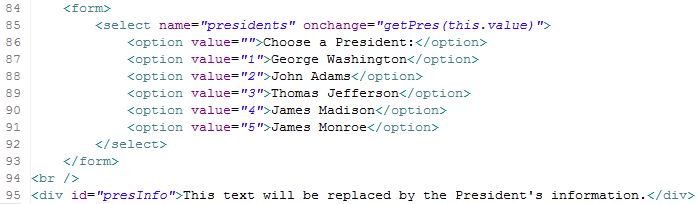
- You’ll notice a little JavaScript within the “select” element. It’s the “onchange” event handler. It’s used to detect when the user selects a President from the drop-down list.
- You’ll also notice the getPres function call within the event handler. When the user selects one of the presidents, the value or that option element (1, 2, 3, 4 or 5) is passed to the “dbid” parameter in our above JavaScript code.
- If you’ll look back again to the URL in the open method, you’ll notice that the dbid value get’s concatenated to the URL.
- You’ll also notice that the URL has a variable named “presdata” appended to the end. This is where it get’s a little complicated but not too bad if you’ve followed me up to this point.
- What I’m doing is declaring the “presdata” variable and giving it the value of the menu item selected.
- For example, let’s say that I chose John Adams from the list. The value would be 2. The equal sign (=) appended to the “presdata” variable is a JavaScript assignment operator.
- It assigns the value of 2 to the “presdata” variable and sends it to the PHP page for processing. The PHP page uses that value to determine which id in the database to send back to the AJAX call.
- When the data returns, it’s populated within the “div” tag with the id of “presInfo”. Voila…your application fully executes!
PHP Page Explained
Next we’ll take a brief look at the PHP page.
- Line 9 is retreiving the value of the “presdata” variable we appended to the URL sent from the application page.
- The next few lines establish the database connection and display an error if there’s a problem with the connection.
- The next section (lines 19 – 41) is used for populating the HTML table with the data from the database.
- The last statement (line 43) simply closes the database connection.

Database Explained
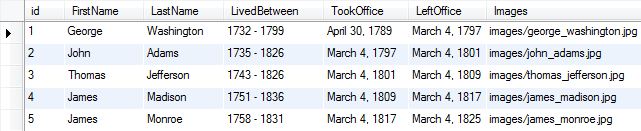
The last figure is the most simple one to explain.
I just used a mySQL database and populated it with the information for the presidents.
You’ll notice that id is the primary key. That’s the number used for the “presdata” variable.
The images column contains the path to the file in the “images” folder.
There you have it. If you have any questions feel free to send me an email via my
contact page and I’ll try my best to help you out.